How to Install Cassandra on Ubuntu

Steps to install cassandra on Ubuntu:

1) First check which version of Java is installed by running the following command in a terminal (Oracle JRE is recommended),

java -version

2) Install curl using the following command

sudo apt-get install curl

3) Add the DataStax Community repository to the aptitude repository source list file (/etc/apt/sources.list).

sudo apt-add-repository “deb http://debian.datastax.com/community stable main”

4) Add the DataStax repository key

curl -L http://debian.datastax.com/debian/repo_key | sudo apt-key add –

5) Update the repository

sudo apt-get update

6) Install datastax community package

sudo apt-get install dsc21

Now Cassandra was successfully installed and running on your machine.

7) Use the following command to start the cassandra server as a service

sudo service cassandra start

8) Use the following command to stop the cassandra server as a service

sudo service cassandra stop

9) Use the following command to find the cassandra server service status

sudo service cassandra status

10) To find the Process ID for Cassandra and kill the service

ps auwx | grep cassandra
sudo kill [pid]

11) To Start cassandra client use the following command,

cassandra-cli

12) To check connection to Cassandra Instance with nodetool

nodetool –host 127.0.0.1 ring

The Output will Confirm that the Cassandra Database is Successfully Installed on Your Ubuntu System.

13) cqlsh is an interactive command line interface for Cassandra. cqlsh allows you to execute CQL (Cassandra Query Language) statements against Cassandra. Using CQL, you can define a schema, insert data, execute queries. Run the following command to connect to your local Cassandra instance with cqlsh:

cqlsh

14) Cassandra Query Language to execute within cqlsh:

create keyspace scorecard with replication = {‘class’:’SimpleStrategy’, ‘replication_factor’:1};

select * from system.schema_keyspaces;

use scorecard;
create table teamscorecard (teamname varchar, teamid int, releasetimeuuid timeuuid, releaseid int, actualid double, actualgrowth double, PRIMARY KEY (teamname,teamid));

insert into teamscorecard (teamname, teamid , releasetimeuuid , releaseid , actualid , actualgrowth ) values (‘HE Portal’, 100,now(),20,3.0,4.0);

select * from teamscorecard;

select * from teamscorecard where teamname = ‘HE Portal’;

create index on teamscorecard (releaseid);

describe columnfamily teamscorecard;

ALTER KEYSPACE scorecard WITH replication = {‘class’: ‘SimpleStrategy’, ‘replication_factor’ : 2};

DROP KEYSPACE scorecard;

ALTER TABLE teamscorecard ADD year varchar;

create table testmaptable (id int PRIMARY KEY , clus_columns map<int,text>);

select * from testmaptable;

insert into testmaptable (id,clus_columns) values (1,{1:’number one’});

update testmaptable set clus_columns = {2:’number two’} where id = 1;

update testmaptable set clus_columns = clus_columns + {1:’number one’} where id = 1;

15) commands to execute within cassandra-cli:

cassandra-cli -h host -p rpc_por [cassandra-cli -host localhost -port 9160]

CONNECT localhost/9160; // To connect with specific host

CREATE KEYSPACE scorecard with placement_strategy = ‘org.apache.cassandra.locator.SimpleStrategy’ and strategy_options =  {replication_factor:1};

USE  scorecard;

LIST teamscorecard;

DROP KEYSPACE scorecard;

For reference, https://wiki.apache.org/cassandra/NodeTool

Installation of cassandra will create the following directories and uses of them are mentioned within the brackets.

  • /var/lib/cassandra (data directories)
  • /var/log/cassandra (log directory)
  • /var/run/cassandra (runtime files)
  • /usr/share/cassandra (environment settings)
  • /usr/share/cassandra/lib (JAR files)
  • /usr/bin (binary files)
  • /usr/sbin
  • /etc/cassandra (configuration files)
  • /etc/init.d (service startup script)
  • /etc/security/limits.d (cassandra user limits)
  • /etc/default

Cassandra Reference URL,

https://wiki.apache.org/cassandra/GettingStarted

http://www.datastax.com/resources/tutorials

http://www.tutorialspoint.com/cassandra/index.htm

Permanent link to this article: https://blog.openshell.in/2015/04/how-to-install-cassandra-on-ubuntu/

YII Command tool not working

Problem:

YII Command tool was not working in the newly created YII application, While using the below command in the command prompt not getting any respond, but normally its work with other YII application. Every path has been configured correctly and not getting any errors.

/var/www/yii-1.1.16/framework/yiic shell

Screenshot:

Screenshot from 2015-03-30 08:48:24

Solution:

This caused due to access rules has been configured in the new YII application, So index.php is not accessible without login, the YII command (yiic) tool will be failed without performing operation. To overcome this issue by specifying the path to the config file.

/var/www/yii-1.1.16/framework/yiic shell ./protected/config/main.php

Screenshot:

Screenshot from 2015-03-30 08:57:37

Permanent link to this article: https://blog.openshell.in/2015/03/yii-command-tool-not-working/

How to setup Cordova on Ubuntu for Android app development

Follow the belows steps to configure cordova with Android SDK on Ubuntu machine:

Install Java & ANT:

First, check you’ve got Java and Ant installed – you’ll need those later:

sudo apt-get install default-jre
sudo apt-get install default-jdk
sudo apt-get install ant

Install Nodejs:

Run the following command to install NodeJS:

sudo apt-get install nodejs

If that doesn’t work, you can install NodeJS through a PPA repository:

sudo apt-get install python-software-properties
sudo add-apt-repository ppa:chris-lea/node.js
sudo apt-get update
sudo apt-get install nodejs

Okay, let’s check to make sure NodeJS is now installed:

nodejs -v

You should get a result like this:

v0.10.25

Install NPM:

To install NPM, simply run the following command:

sudo apt-get install npm

To make sure NPM is installed, run:

npm -v

The result should look like:

1.3.10

Install Git:

Cordova uses Git in the background to download assets when creating a new project. I have created a Cordova project without Git installed and assets were still downloaded, but let’s be safe. Execute the following command:

sudo apt-get install git

Install Apache Cordova:

We will use Node Packaged Modules (NPM) to install Apache Cordova.

sudo npm install -g cordova

That’s it! Let’s make sure it’s installed and to check the version:

cordova -v

Which should give a result like this:

3.5.0-0.2.6

After installing the cordova utility, you can always update it to the latest version by running the following command:

sudo npm update -g cordova

Use this syntax to install a specific version:

sudo npm install -g cordova@2.8.0

Run the info command for a listing that includes the current version along with other available version numbers:

npm info cordova

Install Android SDK:

Download the Android sdk from http://developer.android.com/sdk/index.html, and unpack it somewhere (I had problems with file permissions when I put it under /opt, so I ended up putting it under my home directory, as ~/android):

mv ~/Downloads/adt-bundle-linux-x86.zip ~/android
cd ~/android
unzip adt-bundle-linux-x86.zip

Update PATH in ~/.bashrc to include the phonegap tools:

# Add android sdk
PATH=$PATH:~/android/adt-bundle-linux-x86/sdk/platform-tools:~/android/adt-bundle-linux-x86/sdk/tools

and then ‘source ~/.bashrc’ to make sure you’ve got the new path setup.

Creating Your First Cordova Project:

Now let’s take a moment to quickly go over creating your first Apache Cordova app project.

To create your app, use the following command:

cordova create

To add platforms, we will need to switch to the app’s folder:

cd

Where is the folder where the source is held.

Now that we are in the folder, we can add platforms like so:

cordova platform add <platform-name>

cordova platform add android

Where is the platform you want to add. Platforms include: ios, amazon-fireos, android, blackberry10, firefoxos, wp8, and windows8. For wp8 and windows8, you should be on a Windows machine.

Run this to check your current set of platforms:

cordova platforms ls

Run either of the following synonymous commands to remove a platform:

cordova platform remove <platform-name>

Once you are ready to build your project, make sure you are in the project folder and run the following:

cordova build

To build the project for specific platforms, use the following example command:

cordova build <platform-name>

cordova build android

Where is the platform you want to build. Platforms include: ios, amazon-fireos, android, blackberry10, firefoxos, wp8, and windows8. For wp8 and windows8, you should be on a Windows machine.

The cordova build command is a shorthand for the following:

cordova prepare <platform-name>

cordova compile <platform-name>

Test the App on an Android Emulator or Device:

Run a command such as the following to rebuild the app and view it within a specific platform’s emulator:

cordova emulate android

Some mobile platforms emulate a particular device by default, such as the android projects. For other platforms, you may need to first associate a device with an emulator.

Happy blogging and please drop your comments and queries to improvise the details in the post. Thanks for reading my post.

Permanent link to this article: https://blog.openshell.in/2014/12/how-to-setup-cordova-on-ubuntu-for-android-app-development/

Node.js on Express Framework Installation with mysql(UBUNTU)

Step1:

Download the node setup:

curl -sL https://deb.nodesource.com/setup | sudo bash –

Step2:

Install Node.js

sudo apt-get install -y nodejs

Step3:

Install npm and essential Add ons:

Note:

npm is the default package manager for Node.js.
As of Node.js version 0.6.3, npm is bundled and installed automatically with the environment.
npm runs through the command line and manages dependencies for an application.

sudo apt-get install -y build-essential

Step4:

Install Express Framework

sudo npm install -g express-generator

Step5:

For ceating an example application in express, please use the following link:

http://quickleft.com/blog/getting-started-with-express-in-node

Note:

To start the application use the command npm start instead of node app.js.Since we are using node package manager.

Step6:

Installation of mysql connector for node.js,please use the following link.

http://netai-nayek.blogspot.in/2014/08/connect-mysql-database-nodejs-with.html

Permanent link to this article: https://blog.openshell.in/2014/11/node-js-on-express-framework-installation-with-mysql/

MySQL Error, “java.sql.SQLException: Value ‘0000-00-00 00:00:00’ can not be represented as java.sql.Timestamp” on ColdFusion 11

Issue:

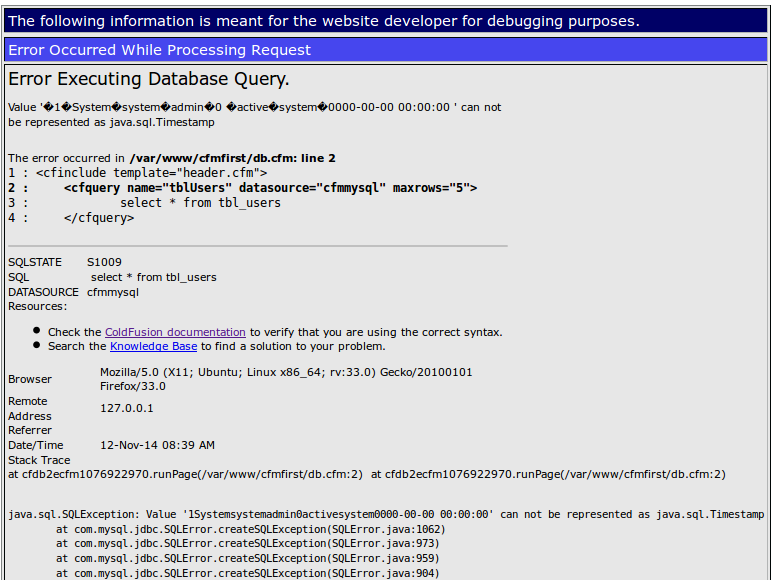
Queries to MySQL may return the error, “java.sql.SQLException: Value ‘0000-00-00 00:00:00’ can not be represented as java.sql.Timestamp” or similar. This error appears when using the Adobe ColdFusion MySQL 5 JDBC driver.

error_message

Reason:

This error occurs when the MySQL Date or DateTime columns have a value of all zeros (for example, ‘0000-00-00 00:00:00’). The default behavior now is to throw the exception, “java.sql.SQLException: Value ‘0000-00-00 00:00:00’ can not be represented as java.sql.Timestamp”.

Solution:

The default value of this property is exception and the cause of the error. Setting the connectstring value of zeroDateTimeBehavior=convertToNull will eliminate this exception and cause null values to return from the database. In this case, zero value date and datetime will appear as empty strings in ColdFusion output.

The specific steps to fix this in ColdFusion are to create a MySQL datasource in the ColdFusion administrator as usual. However, you must also click the Advanced Settings button and enter the connectstring value of zeroDateTimeBehavior=convertToNull.

Note: Do not enter apostrophes or quotes. Also, this is case-sensitive and must be entered just as shown.

solution


Permanent link to this article: https://blog.openshell.in/2014/11/mysql-error-java-sql-sqlexception-value-0000-00-00-000000-can-not-be-represented-as-java-sql-timestamp-on-coldfusion-11/

How to install MongoDB in Ubuntu14.04

Follow the below steps to install MongoDB in Ubuntu:

1. Import the MongoDB public key
Ubuntu package manager use this key to check the consistency and authenticity of the packages

sudo apt-key adv –keyserver hkp://keyserver.ubuntu.com:80 –recv 7F0CEB10

2. Generate a file with the MongoDB repository url
echo ‘deb http://downloads-distro.mongodb.org/repo/ubuntu-upstart dist 10gen’ | sudo tee /etc/apt/sources.list.d/mongodb.list

3. Refresh the local database with the packages
sudo apt-get update

4. Install the last stable MongoDB version and all the necessary packages on our system
sudo apt-get install mongodb-org

MongoDB installed successfully on the machine, now you can start using of it.

Basic commands and other details:

5. Now, our local MongoDB instance is running, we can check it with
$ ps -ef | grep mongo

6. How can we check the installed version?
$ mongo –version

7. How can we open a MongoDB shell?
$ mongo

8. How to start the mongod service
$ sudo service mongod start

9. How to stop the mongod service
$ sudo service mongod stop

10 . How to restart the mongod service
$ sudo service mongod restart

To Know the directories where MongoDB stores the sources, logs and our data:

Sources: /usr/bin/
Logs: /var/log/mongodb/mongod.log
Data: /var/lib/mongodb/

To install MongoDB by specific version follow the command:
$ apt-get install mongodb-org=2.6.1 mongodb-org-server=2.6.1 mongodb-org-shell=2.6.1 mongodb-org-mongos=2.6.1 mongodb-org-tools=2.6.1

Reference Link: http://docs.mongodb.org/manual/tutorial/install-mongodb-on-ubuntu/


Permanent link to this article: https://blog.openshell.in/2014/11/how-to-install-mongodb-in-ubuntu14-04/

Attachment Failed on Gmail using Firefox 32

Recently I was faced problem while attaching document on gmail using firefox browser. I was followed the below steps to resolve the problem in my firefox v32.0.3 browser.

Step 1: In Firefox address bar, type “about:config”.
Step 2: Agree to warranty warning.
Step 3: In search area type “network.http.spdy”, It will list the filtered result in the page.
Step 4: Double click the “Network.http.spdy.enabled” so that the value becomes false.
Step 5: Now restart your firefox browser.

It will works, I worked for me on Windows7, Firefox and Kaspersky firewall. Feel free to share your comments to improve the post details.


Permanent link to this article: https://blog.openshell.in/2014/10/attachment-failed-on-gmail-using-firefox-32/

How to read large XML files efficiently using PHP?

Recently I was faced problem of parsing large XML file using PHP. While parsing small files are no problem and all its quickly parsed, an attempt to parse larger files often causes time-out or Internal Sever Error.

We will not able to use DOM or SimpleXML extension to parse the large XML documents in PHP. As DOM and SimpleXML extension will loads the entire XML document into memory while parsing, it will not work for Large XML documents.

Then how we read large XML document using PHP?

PHP will have another extension called XMLReader, This extension is enabled by default as of PHP 5.1 onwards.

How this XMLReader extension differs from others?

XMLReader will reads XML documents on stream base. So, It will not store the entire document in the memory. Instead, they read in one node at a time and allow you to interact with in real time. Once you move onto the next node, the old one is thrown away – unless you explicitly store it yourself for later use. It makes the Stream based parser faster and consume lesser memory.

But DOM or SimpleXML are tree based parsers, It will stores the entire document on memory and store the document into a data structure called Tree. Its the better option for smaller XML documents. But it does not work for large XML document as it causes major performance issue or other error like time-out.

How to use XMLReader?

Code snippet to load data XML document or Load XML data from variable.

[php]
<?php
$document = "<products><item><name>Prod 1</name><price>$2.00</price></item><item><name>Prod 2</name><price>$5.00</price></item></products>";
//Create a new XMLReader Instance
$reader = new XMLReader();
//Loading from a XML File or URL
$reader->open(‘document.xml’);
//Loading from PHP variable
$reader->xml($document);
?>

[/php]

Code snippet to loop the XML document

[php]
<?php
//Loop through the XML Document
while($reader->read())
{
/* Process XML */
// Start element of XML document
if($reader->nodeType == XMLReader::ELEMENT && $reader->localName == ‘name’){
//move to the text node
echo $reader->readString();
}

// End element of XML document
if($reader->nodeType == XMLReader::END_ELEMENT) {

}
}
?>

[/php]

Hope this post would help you to start with XMLReader and parsing large XML Document. You can explore more into XMLReader and its methods at http://php.net/manual/en/book.xmlreader.php.

Permanent link to this article: https://blog.openshell.in/2014/09/how-to-read-large-xml-files-efficiently-using-php/

How to remove Ubuntu option on the Windows Boot Manager menu?

Recently I have installed ubuntu using Wubi (Ubuntu installer) side by side with windows 7, After that I have uninstalled ubuntu successfully. However when I boot my machine, the Windows Boot Manager will displayed both Windows and Ubuntu.

I have followed the below steps to remove Ubuntu from the Windows Boot Manager option:

Step 1:

Click the “Start” button and type “cmd” Right-click “cmd.exe”, select “Run as Administrator” and click “Yes” to open Command Prompt with elevated privileges.

Step 2:

Type “bcdedit” and press “Enter” key in the command prompt.

It will list the Windows Boot Manager entries as below:

C:\Windows\system32>bcdedit

Windows Boot Manager
——————–
identifier {bootmgr}
device partition=C:
description Windows Boot Manager
locale en-US
inherit {globalsettings}
default {current}
resumeobject {429cb2d3-151b-11e2-bf5e-967bb14e68ee}
displayorder {current}
toolsdisplayorder {memdiag}
timeout 10

Windows Boot Loader
——————-
identifier {current}
device partition=C:
path \Windows\system32\winload.exe
description Windows 7
locale en-US
inherit {bootloadersettings}
recoverysequence {429cb2d5-151b-11e2-bf5e-967bb14e68ee}
recoveryenabled Yes
osdevice partition=C:
systemroot \Windows
resumeobject {429cb2d3-151b-11e2-bf5e-967bb14e68ee}
nx OptIn

Real-mode Boot Sector
———————
identifier {429cb2d3-151b-11e2-bf5e-967bb14e68ee}
device partition=C:
path \ubuntu\winboot\wubildr.mbr
description Ubuntu

Step 3:

In the list “Real-mode Boot Sector” entry that has the description as Ubuntu. Copy the “identifier” and run the following command in command prompt, to delete it from the Windows boot manager option.

C:\Windows\system32>bcdedit /delete {429cb2d3-151b-11e2-bf5e-967bb14e68ee}

Step 4:

Now you can reboot your machine, Ubuntu option will be removed from your Windows Boot Manager menu.

I hope this will solve your problem, Please share your comments.

Permanent link to this article: https://blog.openshell.in/2014/09/how-to-remove-ubuntu-option-on-the-windows-boot-manager-menu/

MySQL zerofill and lpad – Shape digits in DB

I’m working with an application to have the item code. Item code column is set as an INT(5) but not all the item code values are 5 digits. So I need to round off the item code based on 5-digits. If the item code is 199, it should be display as 00199.

How to make the smaller numbers into 5-digits?

Solution:

There are two methods available in MySQL to do.

1) Alter the table using the ZEROFILL in MySQL. This will add 0’s to the left of your values up to the max number of digits defined for that column:

[sql]ALTER TABLE [table_name] MODIFY COLUMN [column_name] INT(x) ZEROFILL UNSIGNED;[/sql]

Where,
table_name = table name to alter the column
column_name = desired column name to add 0’s
x = number of digits allowed in the column

Adding ZEROFILL will not cause any issue on the existing table by having foreign key value.

2) This method will helps to pad the values using LPAD() in your query, without altering the table:

[sql]
SELECT LPAD(column_name,x,’0′) FROM table_name;
[/sql]

Where,
table_name = table name to alter the column
column_name = desired column name to add 0’s
x = number of digits allowed in the column

Example:

[sql]
— Alter table to append Zero’s with specified column. Will reflect in table level
ALTER TABLE products MODIFY COLUMN item_code INT(5) ZEROFILL UNSIGNED;

— Select column value with append Zero’s. Will reflect in query level
SELECT LPAD(item_code, 5,’0′) FROM products;
[/sql]

Hopefully this will help out.

Permanent link to this article: https://blog.openshell.in/2014/09/mysql-zerofill-and-lpad-shape-digits-in-db/